Monday, September 12, 2011

Fleet Captain: Improbably Dense Asteroid Fields

The asteroid rules for Fleet Captain can be used as a springboard for designing other space hazards.

First, let's begin by acknowledging that in the real world asteroids are rarely dense enough to pose a threat as a group.  Still, we all love the asteroid field sequence in Empire Strikes Back, so we darn well need asteroid rules in our game.  From a design point of view, asteroids (and any other terrain) needs to providing insteresting variation to the game without so overwhelming the other rules as to warp overall design.  In other words, we want asteroids, they need to be exciting but also nod vaguely towards realism and we have to make sure the game doesn't become about them.

Let's start with a simple assumption: if we are using asteroids then the whole map is a segment of the asteroid field.  Every ding dang hex has one or more smallish and uninteresting asteroids in them that for all purposes we ignore mechanically.  The asteroid markers we are going to place on the board represent areas of particularly high danger.  You can think of those markers as the "big rocks" if you like, but a more sophisticated reading of the simulation at work here would be that those markers indicate crests in the density waves that propogate through the asteroid field.

Anyway, each asteroid marker needs to contain two pieces of information, a direction arrow and a density rating from 1 to 6.  Something like this:
The arrow is in the corner for no particular reason.  You're going to place these on the map facing a hexside just like the nose of a ship.  Note that if you are using miniatures you can omit the number, simply place a small number of asteroids on a single base; the number of rocks on the base is the density rating.  Make sure the base has an arrow marked on it.

You don't need many of these asteroids to jazz up a space battle, one of each size 1 to 6 is probably enough for most space maps.

Okay, let's look at the mechanics for these babies.  Each turn asteroids are moved after you place movement markers but before you start flipping cards.  Roll d6 for each asteroid marker and move it that many hexes in a straight line.  If you move off the map place it opposite where it exited, next turn it will re-enter the map there.

Did you just pass an asteroid through a ship or land on the same hex as one?  Good, 'cause now its time to learn what happens when you try to occupy the same space as a few million tons of space rock.  Roll a d6 to avoid contact.  If you get above the asteroid density rating, you are safe.  If you don't, you're in trouble.  Roll d20 damage.  Shields do not protect you, you are just straight up taking a big pile of Hull Damage here.  The one thing that might save you is your Laser(s).  Each Laser shaves off d6 worth of incoming asteroid damage.  If the asteroid marker tried to end it's movement in your hex, move it one more hex.  Nature may abhor a vacuum but Fleet Captain abhors having two objects in the same hex.  That's a big pain in the ass when using minis.

The same basic procedure applies when you try to fly through an asteroid hex.  The two main differences are that A) you can attempt the Special Maneuver called Avoid Hazard to increase your chances of successfully negotiating the field and B) if you try to end your turn on an asteroid hex it is your vessel that moves one extra hex, not you.

The other important thing to know about asteroids is that they attenuate weapons fire that passes through them.  Subtract the density rating from the attack roll of any fire passing through the hex.

Where to initially place the asteroids is something of an art form.  One way to do it is to try to guess which rows on the map will be most conducive to screwing up the battle for everyone, then rolling dice to determine the hexes along those rows that the asteroids begin in.  The longest rows on the map are usually a good bet, something like this:


But obviously how you set up the fleets will have an impact on choosing where to put the asteroids.  In most scenarios you don't want the initial placement to destroy any vessels before the first turn of the cards.

I prefer my asteroids to all float in the same direction, but what do I know?

canonical BX to-do list: elves

This is the last of the BX to-do lists.  So if you're one of the many Gameblog readers confused or annoyed by this series, you may begin your celebrations.

Level 1
Join a Basic NPC party
Serve as a Retainer to a PC
Serve as a mercenary
Pal around with up to 23 fellow 1st level elves

Level 2
Join a Basic NPC party
Serve as a Retainer to a PC of at least the same level
Lead up to 24 1st level elves

Level 3
Join a Basic NPC party
Serve as a Retainer to a PC of at least the same level
Lead up to 24 1st level elves
Join an Expert NPC party
Retainer to a Fighter level 7 to 10

Levels 4 to 6
Serve as a Retainer to a PC of at least the same level
Lead up to 24 1st level elves
Join an Expert NPC party
Retainer to a Fighter level 7 to 10

Level 7
Serve as a Retainer to a PC of at least the same level
Lead up to 24 1st level elves
Join an Expert NPC party

Level 8
Serve as a Retainer to a PC of at least the same level
Join an Expert NPC party

Levels 9 and 10
Serve as a Retainer to a PC of at least the same level
Join an Expert NPC party
Found an elvish stronghold
Make magic items

Sunday, September 11, 2011

canonical BX to-do list: dwarf

Level 1
Pal around with up to 39 fellow first level dwarves
Join a Basic NPC party
Serves as Retainer to a PC
Serve as a mercenary


Level 2
Join a Basic NPC party
Serves as Retainer to a PC of at least the same level


Level 3
Join a Basic NPC party
Serves as Retainer to a PC of at least the same level

Lead up to 40 first level dwarves
Serve as Retainer to Fighter level 7 to 10


Levels 4 to 6
Serves as Retainer to a PC of at least the same level
Lead up to 40 first level dwarves
Serve as Retainer to Fighter level 7 to 10

Levels 7 and 8
Join an Expert NPC party
Serve as Retainer to a PC of at least the same level

Levels 9 to 12
Lead up to 40 first level dwarves

Join an Expert NPC party
Serves as Retainer to a PC of at least the same level
Found a dwarf clan stronghold

Saturday, September 10, 2011

mysterious solved

Thanks to the Lost Minis Wiki I have solved a personal mystery that has baffled me for more than 25 years.  Circa 1983 was a different time for D&D.  On one hand, the Game we love was under attack for being Satanic.  On the other hand, you could find D&D stuff for sale in the Sears Christmas catalog.  One year some boxes of miniatures were among the wares stocked by Sears.  I fell in absolute love with this one figure in a tiny photo, a painted pic of a dude riding a giant spider and carrying a shield with a spider web device.  That dude was super bad.  How tough to you have to be to tame a friggin' giant spider and ride it around like a pony???

I've been looking for that spider riding badass one and off ever since.  Now I know why I've never found him.  Dude wasn't riding a spider, he was the spider!


I don't know why it never occurred to me that this elusive figure was a drider.  Maybe I just wanted it to be a cool dude riding a spider a little too badly.  Or maybe I'm just a dope.  Either way that shield is still awesome times five.

(Figure from the original Grenadier AD&D line.)

Friday, September 09, 2011

Fleet Captain: the attack chart

This is the first Fleet Captain piece where I'm not so sure of my footing.  Please feel free to tell me that ships are too fragile under these rules.  I can't make up my mind.


If I did my math right, this chart expresses a very simple idea:
  • Roll attack the attack die, roll the defense die.
  • If the attack die is higher, you have penetrated the shields and do damage.
  • Damage inflicted is attack roll divided by defense roll, dropping fractions.
Ship hull points tend to range from 4 to 8 for Escorts, 6 to 12 for Cruisers and 10 or higher for Battleships and such.  Ships can blow up fast and unexpectedly.

One of my design goals is being able to play out a 3-battle mini-campaign in a single 4 hour convention slot, so ships shouldn't last too long once the shooting starts.

However, running out of hull points doesn't automatically damn your ship.  Each round you are out of hit point you roll on the Countdown to Doom chart to follow.  You might survive a few more turns at diminished capacity or you might be able to trick someone into boarding your ship just before your self-destruct system activates.  Or maybe you just plain explode, inflicting damage on neighboring vessels.  As with everything else, your Fleet Captain is better able to deal with such emergencies.

3rd Expedition to the Caves of Myrddin

All the adventurers mooching off the hospitality of the monks of St. Emmet's and not actually getting around to much adventure get a rude wake-up call this morning.  Just two days after one party steals Joe Mama's sack of gold, a new group returns with thousands and thousands of gold pieces worth of gems and jewels.

This illo of Hugo le Bâtard by Jeremy
totally nails the spirit of the campaign.

Today's players were Anthony, Jeremy, John and Zak, playing Rando the Halfling (a Halfling Stew survivor), Hugo le Bâtard, Father Nicholas and Blixa the Thief.  Blixa is a survivor from previous FLAILSNAILS adventures with three levels of thievery under his belt.  He also has a pet war poodle and enough gold to try a roll on my draft henchmen chart.  Poor fellow spent 500 gold and ended up with a Hopeless Loser.  The Loser in question never made it back to the Abbey, taking a lethal pounding from the mysterious and deucedly hard to kill Yelling Naked Tarbaby Dude.  That's a Hopeless Loser's main job, to take a hit that would otherwise kill a character we actually care about.  He also handled some stirge guano that was part of a Clever Plan.  It's nice to have underlings in those situations.

Since three of them blow a big portion of their share on carousing, they will inevitably let slip details of their adventure this morning.  Fearing the wrath of Joe Mama and suspecting the best treasure has already been found, today's group eschewed the Big Cave and tried the Small Cave instead.  In addition to the stirges and the Yelling Naked Tarbaby Dude, they fought some gigantic fiddler crabs and parlayed with some gnome adventurers.  The gnomes were travellers from some far off realm, who arrived via a strange teleporter machine located in an underwater dungeon.  They arrived at a similar device located in the cave.  Giant fiddler crabs killed half their party before the PCs showed up.  Yelling Naked Tarbaby Dude killed another, while the last gnome was accidentally doused in flaming oil.  Hugo was nearly killed by the Yelling Naked Tarbaby Dude after getting his hand stuck inside its stomach, but another PC and the Loser (who was naked as well at this point, don't ask) managed to extricate him.  Hugo was later revived with a skin of wine.

Another great session of dungeon shenanigans.  The party made good use of terrain, oil and missile weapons to keep the number of melees to a minimum.  Which is a good idea when dealing with blood-sucking bird-bats and crabs with pincers big enough to decapitate a man.

Fleet Captain: initial thoughts on weapons systems

Worf: They are now locking lasers on us.
Riker: Lasers?
Worf: Yes, sir.
Picard: Lasers can't even penetrate our navigation shields. Don't they know that?
Riker: Regulations do call for a yellow alert.
Picard: Mmm, a very old regulation. Well, make it so, Number One. And reduce speed, drop main shields as well.
Riker: May I ask why, sir?
Picard: In case we decide to surrender to them, Number One!

I love that sequence.

Most vessels in Fleet Captain have three kinds of weaponry.  You can call these Primary, Secondary and Tertiary weapons if you'd like, but I tend to think of them as Torpedoes, Phasers and Lasers.  Rename them as better suits your own sci-fi universe.  If I was running a Traveller-themed game I'd call them Spinal Mount, Batteries and Turrets, for a Star Wars game I'd trade out Phasers for Blasters, etc.

These weapons are differentiated very simply. 

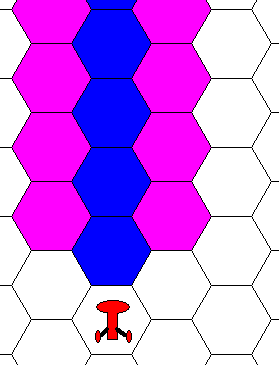
Torpedoes are Forward Firing Only.  Check out this figure.


The colored hexes represent where the red ship can target a foe with Torpedoes.  Targets in the blue centerline are attacked at ONE DIE BETTER than you normally get when rolling an attack.  So if you have a big battleship with d12 powered to weapons, break out that that d20!  For targets in the purple regions, slightly off the centerline, you get to add a flat +1 to your attack roll.  Plus you get the added benefit of being able to make an extra attack.

The other two weapons systems have 360 degree fields of fire.

Phasers use whatever die you've allocated to weapons.  You get one, two or three vollies of Phaser fire per turn, depending on the size of your ship.  If you have multiple targets in range each volley must each target a different ship, starting with the nearest enemy vessel, unless your captain executes an Alpha Strike special maneuver.

The range of Torpedoes and Lasers is equal to their die type.  E.g. a Phaser powered to a d10 has a range of 10 hexes. 

(If you like lots of fire across large boards, here's an optional rule: Each weapon's range band is based upon its die size.  Die size drops after each band.  That d10 Phaser attacks as a d10 at range 0 to 10, as a d8 at 11 to 20, as a d6 at 21-30 and as a d4 at 31 to 40.)

Lasers are primarily designed to shoot down enemy fighters and missiles, blast away debris, etc.  Most ships get one laser attack per turn.  Swarming fighters and similar targets are attacked at a d6, even if the ship has powered weapons only to a d4.  Using a Laser for anti-ship purposes is allowed, but at d4-1 to a max range of 3.

So if you have a typical big ship with a single foe directly ahead at range 3 or less, you can make up to five attack rolls against the foe.  This is why big ships try to keep escorts handy, to draw at least some of that fire.

Carriers, minelayers, missile ships and other specialty attack craft usually do not mount any Torpedoes.